Siding contractors play a crucial role in enhancing the curb appeal and protecting the structural integrity of homes. They offer a range of services, from initial consultation and material selection to installation and ongoing maintenance. Understanding the process, from choosing the right siding material – such as vinyl, wood, fiber cement, or metal – to selecting a reputable contractor, is key to a successful project. This guide will equip you with the knowledge to navigate every step, ensuring a beautiful and long-lasting exterior for your home.
This comprehensive overview covers everything from the various siding options and their respective pros and cons to the intricacies of the installation process. We’ll delve into choosing a reliable contractor, managing costs effectively, and maintaining your new siding for years to come. We also address legal and safety considerations to ensure a smooth and problem-free experience.


Siding Contractor Services Offered
We provide a comprehensive range of services designed to enhance the curb appeal and protect your home’s exterior. Our commitment extends beyond simple installation; we offer expert consultation, meticulous project management, and unwavering dedication to customer satisfaction. We aim to deliver a seamless experience from initial consultation to final walkthrough.
Our services encompass every stage of the siding process, from initial assessment and material selection to installation and post-installation care. This ensures a smooth and worry-free experience for our clients.
Siding Material Options and Their Characteristics
Choosing the right siding material is crucial for both aesthetic appeal and long-term durability. Each material offers a unique combination of benefits and drawbacks, influencing factors like cost, maintenance, and lifespan. Understanding these differences allows for informed decision-making.
Vinyl siding is a popular choice due to its affordability and low maintenance. Wood siding offers a classic, natural look but requires more upkeep. Fiber cement siding boasts exceptional durability and fire resistance, while metal siding provides superior protection against the elements. Each option presents distinct advantages and disadvantages.
Comparison of Siding Materials
| Siding Material | Pros | Cons | Approximate Cost Range (per sq ft) |
|---|---|---|---|
| Vinyl | Affordable, low maintenance, variety of colors and styles, easy installation | Can fade over time, susceptible to damage from impact, less durable than other options | $3-$8 |
| Wood | Classic look, natural beauty, can be painted or stained | High maintenance (painting, staining, sealing), susceptible to rot, insect damage, and moisture | $8-$20+ |
| Fiber Cement | Durable, fire-resistant, low maintenance, resists insects and rot | More expensive than vinyl, heavier and more difficult to install, can be brittle | $10-$20+ |
| Metal | Extremely durable, long lifespan, fire-resistant, resists insects and rot, energy-efficient | Can dent, susceptible to scratches, higher initial cost, can be noisy in rain or hail | $12-$25+ |
Note: Cost ranges are estimates and can vary based on factors such as location, labor costs, and specific product choices.
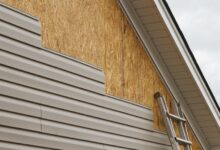
The Siding Installation Process
Installing new siding is a significant home improvement project that enhances curb appeal and protects your home. A successful installation requires careful planning, meticulous execution, and attention to detail at every stage. This process typically involves several key steps, from initial preparation to final cleanup.
The entire process begins with a thorough assessment of the existing structure. This includes identifying any necessary repairs to the underlying sheathing or framing. Then, the installation team will carefully measure the house to determine the exact amount of siding needed, ensuring minimal waste and efficient material use. Proper preparation minimizes potential problems and contributes to a long-lasting, high-quality installation.
Preparation for Siding Installation
Preparing the home for siding installation is crucial for a successful and long-lasting result. This involves several key steps that ensure a smooth, even surface for the new siding. Neglecting these steps can lead to issues like uneven siding, moisture penetration, and premature deterioration.
This phase typically begins with a thorough cleaning of the existing exterior walls. This often involves removing old paint, loose siding, or any other debris. Any damaged areas of the underlying sheathing or framing must be repaired or replaced before installation commences. This ensures a solid and stable base for the new siding. Finally, the team will install any necessary flashing and underlayment to prevent water damage.
Underlayment and Flashing: Their Importance
Proper underlayment and flashing are critical components of a successful siding installation. They act as barriers against moisture, preventing water damage to the home’s structure and extending the life of the siding. Ignoring these aspects can lead to costly repairs down the line.
Underlayment, typically a waterproof membrane, is installed over the existing sheathing to create a moisture barrier. It prevents water from penetrating the wall system, even if there are minor gaps or imperfections in the siding. Flashing, typically made of metal, is installed around windows, doors, and other penetrations in the wall to prevent water from entering these vulnerable areas. Properly installed flashing directs water away from the house, preventing leaks and rot. Consider a house with improperly installed flashing around a window; rain could easily penetrate the wall, leading to water damage and mold growth. Proper flashing directs water away, preventing this problem.
Addressing Potential Problems During Installation
Even with meticulous planning and preparation, problems can arise during siding installation. Identifying and addressing these issues promptly is key to a successful project. Ignoring small problems can lead to larger, more costly issues later.
One common problem is uneven siding. This can be caused by variations in the wall’s surface or improper installation techniques. The solution involves careful adjustment of the siding to ensure a consistent and aesthetically pleasing finish. Another potential issue is damage to the siding during installation. Care should be taken to handle materials gently and avoid unnecessary stress. If damage does occur, it should be repaired or replaced immediately to prevent further problems. Finally, inadequate sealing around windows and doors can lead to leaks. Proper caulking and sealing are crucial to prevent water infiltration.
Choosing a Reputable Siding Contractor
Selecting the right siding contractor is crucial for a successful project. A poorly chosen contractor can lead to subpar workmanship, cost overruns, and significant headaches. Taking the time to thoroughly vet potential contractors will save you time, money, and stress in the long run. This section outlines key steps to ensure you choose a reputable and reliable professional.
Contractor Selection Checklist
Before engaging a contractor, it’s vital to gather comprehensive information. A structured approach, using a checklist of pertinent questions, will ensure you address all essential aspects. This process helps you compare different contractors effectively and make an informed decision.
- Years of Experience: Inquire about the contractor’s experience in siding installation, specifically with the type of siding you’ve chosen (e.g., vinyl, fiber cement, wood). Established contractors typically possess a deeper understanding of best practices and potential challenges.
- References and Portfolio: Request a list of recent projects and contact information for previous clients. Reviewing completed work provides a tangible assessment of the contractor’s craftsmanship and attention to detail. Contacting previous clients allows you to gauge their satisfaction directly.
- Licensing and Insurance: Verify that the contractor holds the necessary licenses and insurance coverage (general liability and workers’ compensation). This protects you from potential financial liabilities in case of accidents or damage during the project.
- Detailed Proposal and Contract: Ensure the proposal outlines all aspects of the project, including materials, labor costs, timeline, payment schedule, and warranty information. A comprehensive contract protects both parties and clarifies expectations.
- Permits and Compliance: Confirm the contractor’s understanding of local building codes and their commitment to obtaining necessary permits. This ensures your project complies with regulations and avoids potential legal issues.
- Clean-up Procedures: Inquire about the contractor’s clean-up procedures throughout and at the completion of the project. A reputable contractor will maintain a clean and organized worksite.
Evaluating Bids and Proposals
Once you’ve gathered several bids, careful comparison is essential. Don’t solely focus on the lowest price; consider the overall value offered. A detailed comparison will ensure you choose the best option for your needs and budget.
- Detailed Breakdown of Costs: Examine the breakdown of costs to understand where your money is going (materials, labor, permits, etc.). This allows for a fair comparison between different proposals.
- Warranty Information: Compare the warranty offered on both materials and workmanship. A longer warranty often indicates greater confidence in the quality of work.
- Project Timeline: Evaluate the proposed timeline and ensure it aligns with your expectations. Consider factors like weather conditions and potential delays.
- Payment Schedule: Review the proposed payment schedule and ensure it’s reasonable and protects your interests. Avoid paying the full amount upfront.
- Communication and Responsiveness: Assess the contractor’s responsiveness to your inquiries and their clarity in communication. Good communication is crucial throughout the project.
Verifying Licenses and Insurance
Verifying a contractor’s licenses and insurance is paramount. This protects you from potential legal and financial risks. Failure to verify can result in significant unforeseen expenses and complications.
- State Licensing Boards: Contact your state’s licensing board to verify the contractor’s license status and confirm it’s valid and up-to-date. Many states have online databases for easy verification.
- Insurance Certificates: Request copies of the contractor’s general liability and workers’ compensation insurance certificates. Ensure the coverage amounts are adequate for the project’s scope.
- Proof of Bonding (Optional): While not always required, a surety bond provides additional financial protection. It safeguards you against potential losses if the contractor fails to complete the project or performs substandard work.
Siding Maintenance and Repair
Proper siding maintenance is crucial for preserving your home’s curb appeal and protecting it from the elements. Regular upkeep can extend the lifespan of your siding, saving you money on costly repairs or replacements down the line. Neglecting maintenance, however, can lead to significant damage and expensive repairs. This section outlines a maintenance schedule, common problems and solutions, cleaning and protection tips, and minor repair methods.
Siding Maintenance Schedules
A regular maintenance schedule varies depending on your siding material. Different materials have different vulnerabilities to weather and wear. Adhering to a specific schedule tailored to your siding type is vital for preventing costly repairs.
- Vinyl Siding: Inspect annually for cracks, dents, or loose panels. Clean twice a year with a mild detergent and water. Consider power washing every 2-3 years, but use low pressure to avoid damage.
- Wood Siding: Requires more frequent attention. Inspect quarterly for signs of rot, insect infestation, or paint damage. Repaint or restain every 3-5 years, depending on the climate and paint quality. Annual cleaning with a soft brush and mild detergent is recommended.
- Fiber Cement Siding: Generally low-maintenance. Inspect annually for cracks or damage. Clean as needed with a soft brush and water. Power washing is acceptable every few years, but use caution.
- Aluminum Siding: Durable and relatively low-maintenance. Inspect annually for dents or scratches. Clean with mild soap and water as needed. Aluminum siding can be power washed more aggressively than vinyl, but still use caution.
Common Siding Problems and Solutions
Several common issues can affect siding, ranging from minor cosmetic flaws to structural problems. Early detection and prompt action are key to preventing larger, more expensive repairs.
- Cracks and Gaps: Small cracks can often be filled with caulk appropriate for the siding material. Larger cracks or gaps may require panel replacement.
- Loose or Damaged Panels: Loose panels should be re-secured with appropriate fasteners. Damaged panels usually need replacement. Improper installation is a common cause of loose panels.
- Rot and Decay (Wood Siding): Address rot immediately by removing the affected area and replacing the damaged wood. Preventative measures include proper sealing and painting.
- Insect Infestation (Wood Siding): Treat infestations promptly with appropriate insecticides. Severe infestations may require professional pest control intervention and potentially siding replacement.
- Water Damage: Water damage can manifest as staining, rot, or mold. Repair any leaks promptly and address any underlying moisture problems to prevent further damage.
Cleaning and Protecting Siding
Regular cleaning helps maintain your siding’s appearance and protects it from damage. The cleaning method depends on the siding material.
For most siding types, a solution of mild detergent and water is sufficient. Apply the solution with a soft brush or sponge, scrub gently, and rinse thoroughly with water. Power washing can be effective, but use low pressure to avoid damage, especially to vinyl siding. Always test any cleaning solution in an inconspicuous area first. After cleaning, allow the siding to dry completely before applying any protective coatings.
Repairing Minor Siding Damage
Minor damage, such as small cracks or dents, can often be repaired without professional help. For larger repairs or structural issues, it’s best to consult a siding contractor.
Small cracks in vinyl siding can be filled with exterior-grade caulk. For dents, carefully apply gentle pressure to push the dent back into place. If necessary, use a heat gun to carefully warm the area and make it more pliable (use caution to avoid melting the siding). Always use caulk and paints that are compatible with your siding material. For wood siding, minor damage can be repaired with wood filler and then repainted or stained to match the existing finish. Remember to always allow sufficient drying time between steps.
Cost Considerations for Siding Projects
The overall cost of a siding project can vary significantly depending on several interconnected factors. Understanding these factors is crucial for budgeting and ensuring a smooth project execution. This section will outline the key cost drivers, provide realistic cost ranges, and offer a sample cost breakdown to aid in your planning.
Factors Influencing Siding Project Costs
Several key elements contribute to the final cost of a siding project. These include the size of the house, the type of siding chosen, the complexity of the installation (e.g., requiring extensive repairs or removal of existing siding), labor costs, and any necessary permits or inspections. Regional variations in material and labor costs also play a significant role. For example, labor costs in a major metropolitan area will typically be higher than in a rural setting. Furthermore, the condition of the underlying structure can unexpectedly inflate the cost if significant repairs are needed before new siding can be installed.
Siding Material Cost Ranges
Different siding materials come with varying price tags. Vinyl siding is generally the most budget-friendly option, with prices typically ranging from $3 to $12 per square foot, including installation. Fiber cement siding offers greater durability and longevity but carries a higher price point, usually between $8 and $20 per square foot installed. Wood siding, prized for its aesthetic appeal, is often the most expensive, ranging from $10 to $30 or more per square foot, depending on the type of wood and finish. Metal siding, known for its resilience, falls somewhere in the middle, costing between $7 and $18 per square foot installed. These are broad ranges, and the actual cost will depend on the specific product chosen, its features (e.g., thickness, color, texture), and the contractor’s pricing.
Sample Cost Breakdown for a Typical Siding Installation
The following table illustrates a sample cost breakdown for a 1,500 square foot house with vinyl siding installation. Remember that this is just an estimate, and your actual costs may differ based on your specific project needs and location.
| Description | Quantity | Cost per Unit | Total Cost |
|---|---|---|---|
| Vinyl Siding Materials | 1500 sq ft | $5/sq ft | $7500 |
| Labor Costs (Installation) | 1500 sq ft | $3/sq ft | $4500 |
| Underlayment/Wrap | 1500 sq ft | $1/sq ft | $1500 |
| Permits and Inspections | 1 | $500 | $500 |
| Waste Removal | 1 | $200 | $200 |
| Total Estimated Cost | $14200 |
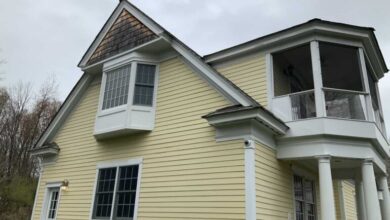
Visual Representation of Siding Projects
A picture truly is worth a thousand words, especially when it comes to showcasing the transformative power of new siding. Before-and-after photos are invaluable tools for demonstrating the impact of a professional siding installation, highlighting not only the improved aesthetics but also the increased property value and enhanced curb appeal. Seeing the difference firsthand allows potential clients to visualize the potential for their own homes.
Before-and-after photos should ideally capture the entire house from a similar angle and under similar lighting conditions. For instance, a before photo might depict a home with faded, cracked vinyl siding, showing noticeable discoloration and damage. Perhaps the gutters are overflowing and the overall appearance is tired and dated. The after photo, on the other hand, would showcase the same house with crisp, new siding, perhaps in a vibrant color or a classic style. The gutters would be clean and well-maintained, and the overall impression would be one of freshness and revitalization. The contrast emphasizes the significant improvement in the home’s appearance.
Visual Appeal of Different Siding Styles and Colors
The choice of siding style and color dramatically impacts the visual appeal of a home. Different materials, such as wood, vinyl, fiber cement, and metal, offer unique textures and appearances. Wood siding provides a rustic, natural charm, while vinyl offers a low-maintenance, versatile option in a wide array of colors. Fiber cement boasts durability and a sophisticated look, mimicking the appearance of wood or stone. Metal siding is exceptionally long-lasting and modern in its aesthetic.
Color selection plays a crucial role in setting the overall tone. Neutral colors like grays, beiges, and whites create a timeless, classic look that complements various architectural styles. Brighter colors, such as blues, greens, and reds, can add personality and vibrancy, making a bold statement. A before-and-after showcasing a transition from a dull, outdated color to a fresh, updated hue can vividly illustrate this impact. For example, a home originally clad in a dark brown siding might be transformed with a light grey siding, instantly brightening the façade and making the home appear larger and more inviting.
Enhanced Curb Appeal Through Proper Installation
Proper siding installation is paramount to achieving optimal curb appeal. A flawlessly installed siding job will exhibit clean lines, even spacing, and precise alignment of panels. There should be no gaps, overlaps, or inconsistencies in the finish. Attention to detail in the installation process, such as proper flashing and caulking around windows and doors, prevents water damage and enhances the overall aesthetic. Furthermore, the installation should seamlessly integrate with other exterior elements, such as trim, windows, and landscaping. A before-and-after comparison would clearly demonstrate the difference between a poorly installed siding job, which might show gaps, uneven lines, and poor integration with other features, and a professionally installed one that presents a clean, cohesive, and visually appealing exterior. The difference is night and day; a well-installed siding job elevates the entire look of the property, while a poorly done one detracts from it significantly.
Legal and Safety Aspects
Undertaking a siding project, whether a large-scale renovation or a smaller repair, necessitates careful consideration of legal and safety protocols to ensure a smooth, successful, and legally compliant process. Ignoring these aspects can lead to costly delays, legal repercussions, and, most importantly, potential injury.
Permitting Requirements for Siding Projects
Obtaining the necessary permits before commencing any siding work is crucial. Local building codes and regulations vary, but generally, permits are required for significant siding replacements or installations, especially those involving structural changes or alterations to the building’s exterior. These permits demonstrate compliance with local building codes, ensuring the project meets safety standards and protects both the homeowner and the contractor from liability. Failure to obtain required permits can result in hefty fines, stop-work orders, and even legal action. Homeowners should contact their local building department to determine the specific permit requirements for their project. Contractors are responsible for guiding homeowners through this process.
Safety Precautions During Siding Installation
Safety is paramount throughout the siding installation process. Contractors must adhere to strict safety protocols to mitigate risks of injury to themselves and the homeowners. This includes, but is not limited to, the use of appropriate personal protective equipment (PPE) such as safety glasses, hard hats, gloves, and fall protection harnesses when working at heights. Proper scaffolding and secure ladders are essential for safe access to elevated areas. The work area should be kept clean and free of debris to prevent accidents. Homeowners should be advised to keep children and pets away from the work area during installation. Furthermore, contractors should communicate clearly with homeowners regarding potential disruptions and safety concerns throughout the project.
Legal Responsibilities of a Siding Contractor
Siding contractors bear significant legal responsibilities. They are legally obligated to perform the work in a professional and competent manner, adhering to all applicable building codes and regulations. This includes using high-quality materials and employing skilled workers. Contractors are also responsible for obtaining the necessary permits and insurance, including workers’ compensation and liability insurance. Crucially, contractors must ensure the work is completed in a timely manner and to the agreed-upon specifications, as outlined in the contract. Failure to meet these obligations can result in legal disputes, potentially leading to lawsuits and financial penalties. Maintaining accurate records of the project, including permits, contracts, and invoices, is essential for protecting both the contractor and the homeowner.
Concluding Remarks
Transforming your home’s exterior with new siding is a significant undertaking, but with careful planning and the right contractor, it can be a rewarding experience. By understanding the services offered, the installation process, and the importance of choosing a reputable professional, you can ensure a successful project that enhances your home’s beauty, value, and protection for years to come. Remember to prioritize thorough research, detailed planning, and clear communication with your chosen siding contractor to achieve the best possible outcome.